Quantcast
Channel: The Garden of Eaden
Viewing all 1613 articles
Browse latest View live

LAVENDER HEDGING PLANTS

$
0
0
Image credit - http://www.pinterest.com/pin/430586414345669776/


WANT TO BUY FLOWER SEEDS? THEN CLICK HERE FOR THE 'SEEDS OF EADEN' SEED SHOP

When you think of hedging plants most people will overlook lavender as a suitable candidate. However with its fragrant, crisp foliage and ornamental flowers lavender is ideal for both formal and informal hedges although formal hedges will require more clipping to keep in shape, which will also prevent flowering.
The lavender genus contains 28 species of evergreen shrubs. The following selection are the best for creating low-growing hedges:

Lavandula angustifolia
Lavandula nana atropurpurea
Lavandula officinalis
Lavandula spica
Lavandula spica 'Hidcote'
Lavandula vera
Lavandula stoechas

Lavenders angustifolia, spica and officinalis are all pseudonyms for the same plant commonly known as Old English lavender'

Be aware that Lavenders spica 'Hidcote' and nana atropurpurea are also the same plant.

Lavandula vera is generally considered to be just a more compact form of Lavandula spica

Lavender hedges are best planted between April and May as the soil is warming up. They will thrive in any ordinary, well-drained soil in a sunny position. Set your plants 9-12 inches apart, or 19 inches apart for larger cultivars. They are even happy to grow in poor, chalky or alkaline soils.

On heavier soils lavender can be fairly short-lived and become woody at the base. To prolong the life of your lavender on heavy soils, dig in plenty of organic matter and gravel to improve the drainage. Whatever your soil type plant your lavender hedge on a ridge to keep the base of the plants out of wet soil.

Prune new hedges to remove any dead flowering stems and lightly trim the plants to shape over the summer. Established hedges should be clipped to shape during March or April.

Lavender hedges are relatively pest and disease free although you can be prone to cuckoo spit in the spring.

HOW MANY CALORIES ARE IN A POTATO?

$
0
0


Potatoes are one of the great British staple foods, and extremely versatile as a cooking ingredient. Boiled, baked, mashed, sauteed or fried we can't get enough of them, but are they good for us or will they make you fat? Of course, whatever you decide to fry in lard and then eat isn't going to be considered a particularly healthy choice, but is the problem with the lard or is it with the potato?

To find out the difference check out the calorific results below.

Calorie and Nutrition Values for 100g of Potatoes

Calories75
Protein2
Carbohydrate16.8
Fat0.2
Fibre1.3


Compare it to 100g chip shop chips and the number change rather dramatically

Calories239
Protein3.2
Carbohydrate30.5
Fat12.4
Fibre2.2


So there you have it, the choice is yours.

HOW TO GROW CORDYLINE AUSTRALIS

$
0
0

Cordyline is a small genus containing approximately 15 species of evergreen trees and shrubs native to New Zealand, Australia, India and South America. However the species that is by far the most cultivated for garden and landscape use is Cordyline australis, otherwise known as the 'cabbage palm' or 'cabbage tree'.

Cordyline australis is a small, conspicuous tree that forms from a single truck bearing a number of stout ascending branches. The older the tree the more branches are produce each branch is crowned by a large dense mass of long sword-like leaves. The flowers are small, creamy-white and particularly fragrant making them a favourite of honey bees. The flowers are produced  on one or more large terminal panicles in the early summer and will last up to six weeks. Once flowering is over the branch holding the flower will break to produce further branches.

Growing up to 25ft tall and 6-10ft wide, Cordyline australis is a slow growing species, but despite its tropical and sub-tropical origins it is surprisingly hardy and as such is a favourite choice for creating a tropical effect in colder, northern European climates.

Cordyline australis will grow well in any fertile, well-drained garden soil. They prefer a sunny position but will also do well in partial shade. They are tolerant to exposed regions with strong winds and even salt spray but foliage will suffer a certain amount for burning at the tips.

To get the most out of your cordyline provide a liquid fertiliser every 10 days or so from May to September.

Water cordylines freely over the summer but only keep moist over winter. They are capable of going down to - 4 to7 degrees Celsius but any further and they will require protection to prevent permanent cold damage.

Cordyline australis was brought into commercial production  in 1823 and received its Award of garden Merit fro the Royal Horticultural Society in 1953.

For related article click onto the following links:
Agapanthus 'Black Pantha'

CORDYINE TREE

$
0
0
The cordyline tree - Cordyline australis is a popular, small-growing specimen tree for both garden and amenity use. Commonly known as the cabbage tree, you can expect it to grow up to 20 metres tall and 10 ft wide in northern European gardens. It is very popular as an ornamental tree in Europe, Great Britain and the United States due to its considerable cold tolerance and exotic, palm-like structure.

Native to the forest margins, river banks and swamps of New Zealand, the largest known specimen is found at Pakawau, Golden Bay. It is believed to be between 400 to 500 years old, and stands an impressive 56 ft  in height with a 30 ft circumference at the base.

The highly perfumed flowers are produced in spring and early summer on large, dense panicles which can be up to 3 feet in length. The individual flowers are only about 0.2 inches wide and once pollinated will produce a white berry no more than 1/4 inch in diameter.

The blooms are particularly attractive to honey bees and in the UK the fruit is a favourite of starlings.

The cordyline tree will grow well in any fertile, well-drained soil. They are tolerant of exposure t strong winds in coastal areas  and will do well position in full sun or semi shade. Water cordyline trees freely over the summer but just keep moist over the winter.

You do not need to prune cordylines, but you can cut of the tops of leggy plans which will promote new growth from below the cut and from the ground.

The indigenous maori people know the Cordyline australis as tī kōuka, and used the tree as a source of food. The stems and fleshy rhizomes of Cordyline australis are high in natural sugars and were steam-cooked in earth ovens to produce kāuru, a carbohydrate-rich food used to sweeten other foods. When the growing tips or leaf hearts are stripped of leaves they can be eaten raw or cooked as a vegetable

The leaves of the Cordyline australis also provided a tough, durable fibre that could be used to make amongst other things textiles, anchor ropes, fishing lines and baskets.

Cordyline australis and its cultivars 'Sundance', 'Torbay Dazzler', and 'Torbay Red' have all received the Award of Garden Merit (AGM) from the Royal Horticultural Society.

SPIDER LILY - Hymenocallis species and cultivars

$
0
0


Spider lilies are a group of some 60 plants from the Hymenocallis genus. The 'spider' part of its rather unusual common name refers to the curious shape of the flowers, which consist of six narrow, curved petals attached to a shallow cup that is formed from the fused stamens. The scented flowers are somewhat daffodile-like

Native to tropical and subtropical America, spider lilies are herbaceous bulbous perennials whose natural habitats include grasslands, wetlands and rocky outcrops. Unfortunately, for those of us who live in northern European climates most Hymenocallis  species and cultivars will need to be grown in a warm greenhouse or in a sheltered sunny spot where the ground doesn't freeze. There is one species however that will tolerate colder climates and that is the North American species Hymenocallis occidentalis. This particular species is found as far north as southwestern Indiana where winters can reach temperatures as low as −18 °C. The hybrid  Hymenocallis x festalis (a cross between Hymenocallis calathina and Elisena longipetala) can also be planted outside in sheltered parts of south and western England, but it must still be protected against frosts.

Pre-packed bulbs are purchased in the autumn onwards and should be planted from November to January. They like good drainage and will grow well in a soil rich with organic matter. For those of use who are trying to grow spider lilies in a cooler, northern European climate then in all fairness you will be better off growing them in pots so that they can be bought in under protection over the winter.

Plant them into 6-8 inch pots using a good quality potting compost such as John Innes 'No2'. The neck of each bulb should be just above the surface of the compost.

For related articles click onto the following links:
The Stargazer Lily

HARDY SPIDER LILIES

$
0
0
Hymenocallis x festalis image credit - http://photos.linternaute.com/


Spider lilies are a group of gorgeous, ornamental flowering bulbs from the Hymenocallis genus. They are mostly from the tropical or subtropical Americas, which means that on the whole they are not hardy enough to be a permanent fixture in the far cooler, northern European gardens. Of course you can grow them as a protected crop and keep them in a frost-free environment over-winter but this involves growing them in pots and bringing them in and out of glasshouse conditions as the seasons dictate.

Image credit - http://www.mtcubacenter.org/
However there are two spider lilies that are just hardy enough to leave outside all-year-round just so long as you can provide a suitably warm and sheltered position.

The first is  There is the North American species Hymenocallis occidentalis which is found as far north as southwestern Indiana where winters can reach temperatures as low as −18 °C. Hymenocallis occidentalis will bloom late in the summer and depending both the plant and its growing conditions the leaves can either be absent or present at bloom time.

The second is a hybrid between Hymenocallis calathina and Elisena longipetala known as Hymenocallis x festalis. This particular cultivar can be planted outside in sheltered parts of south and western England, but it must still be protected against frosts.

Plant each bulb about 5 inches deep and 12 inches apart. Like regular spider lilies they will need good drainage and will grow well in a soil rich with organic matter mixed well in. It is also worth adding a controlled release fertiliser such as osmocote to the immediate soil before planting. Both examples prefer a sunny position, but they will tolerate a certain amount of shade around midday.

During the growing season keep the soil on the moist side and feed with a water soluble fertiliser every 710 days.

For related articles click onto the following links:
SPIDER LILY - Hymenocallis species and cultivars
THE GIANT HIMALAYAN LILY - Cardiocrinum giganteum
The Stargazer Lily

HOW TO GROW SPIDER LILIES

$
0
0

Spider lilies, Hymenocallis species and cultivars, are some of the few great, late summer-flowering bulbs that you can get for the northern European garden and despite their tropical and subtropical origins you can have them flowering in your cold English plot provided you adhere to a few cultivation techniques.

Pre-pack spider lily bulbs will be available in the autumn and should be planted any time from November to January. Plant each bulb into a 6-8 inch pot containing a good quality compost such as John Innes 'No 2'. The neck of each bulb should be just above the surface of the compost. For early flowering species such as Hymenocallis amancaes, Hymenocallis calathina and Hymenocallis x macrostephana maintain a temperature of 13- 16 degrees Celsius.

Later flowering species such as Hymenocallis x festalis and Hymenocallis harrisiana will only need to be kept frost free with a winter temperature of between 3-5 degrees Celsius.

Give spider lilies a diluted, half strength liquid feed at fortnightly intervals from April to August, and shade the greenhouse lightly during the hottest months of the year. They can be watered freely during the growing season but over the winter they will need to be kept just on the moist side. The is one exception which is the evergreen hybrid Hymenocallis x macrostephana. This particular specimen will need to be kept moist at all time.

With all spider lilies, remove and dispose of any dead leaves from both evergreen and deciduous species and cultivars. They can be potted on every second or third year in April, again using John Innes 'No 2'. Those plant which are not being re-potted can be given a given a top-dressing using any good quality compost.

For related articles click onto the following links:


HOW TO GROW JAPANESE PAINTED FERNS

$
0
0


The Japanese painted fern has arguably some of the best ornamental foliage of all garden ferns. Fully hardy and suitable for both partial and heavy shade this gorgeous deciduous perennial is a must for anyone with a passion for the exotic.

It is a steady growing, mound forming species that will reach a height and spread of approximately 18 inches. The deeply cut foliage is grey-green with touches of silver, burgundy, purple and even turquoise. There a number of excellent cultivars to choose from notably:

Athyrium niponicum 'Red Beauty' is a particular favourite withs yellow fronds and a bright red stem.

Athyrium niponicum 'Ursula's Red' is a rarely seen cultivar but possibly the most striking with a wide, near-black band running along the central stem surrounded by a silvery-pink margin.

Athyrium niponicum 'Pictum'  has pale silvery-green fronds and a bright red stem.

Athyrium niponicum 'Pictum Cristatum' is similar to the regular 'Pictum' cultivar but with the addition of crested fronds.

Athyrium niponicum 'Metallicum' produces eye-catching, variegated silver, green and red foliage.

While Japanese painted fern will do best in a semi or fully-shaded position they will show the best colouration is they are subjected to a certain amount of direct light. Of course, give the Japanese painted fern too much light and the fronds will begin to scorch.

Japanese painted ferns will thrive in a neutral to acidic, humus-rich soil. They will like to be kept moist all year round although they will benefit from drying out slightly between waterings. Once established they can become surprisingly drought tolerant.

Plant in a damp, reasonably drained soil and add plenty of humus rich compost such as leaf mould or well-rotted pine needles before hand. Avoid mulching with fertiliser-rich manures and instead provide a spring mulch of moss peat. In cooler northern European climates you may need to provide a dry winter protection of straw or bracken.

HOW TO GROW ABUTILON 'KENTISH BELLE'

$
0
0


The Abutilon genus contains approximately 100 species of half hardy and tender annuals, perennials, evergreen shrubs and small trees however, the one cultivar that you are most likely to find in the United Kingdom is Abutilon 'Kentish Belle'.

Abutilon 'Kentish Belle' is a gorgeous, ornamental, summer-flowering shrub that will grow to a height and spread of between 1,5 and 2.5 metres. It is compact, semi-evergreen with arching shoots and three-lobed, triangular-ovate leaves. The flowers of 'Kentish Belle' are a little special, each one is 4-5cm in length, bell-shaped, with orange-yellow petals boldly contrasting with a dark red calyx

It will grow outside in any ordinary, well-drained soil. It will do best in full sun, but will tolerate light-shade so long as the site is sheltered and warm. Water freely during the growing season, but reduce this down to being kept just moist for the rest of the year.

While the Abutilon 'Kentish Belle's mixed heritage belongs to the tropical regions of south America its hybridization has made it cold hardier than the other species and cultivated varieties.

However, its tolerance to cold and frosts only goes so far and will only allow it to remain planted outside in the milder, southernmost regions of the United Kingdom. Even so it is advisable to provide dried bracken fronds or straw as winter protection in all but the mildest districts

Regarding pruning, remove frosted and dead shoots from outdoor plants in March or April.


HOW TO GROW THE FRANGIPANI TREE- Plumeria rubra var. acutifolia

$
0
0


Commonly known as the Frangipani tree, Plumeria rubra var. acutifolia is a deciduous plant native to tropical and subtropical regions of Mexico, Central America, Colombia and Venezuela. It is an ornamental flowering tree with a spreading habit, growing up to 7–8 m in both height and width. There is some variation in the flowers from tree to tree ranging from shades of pink, white and yellow. The flowers themselves are highly fragrant and are produced in large quantities over the summer and autumn.

The common name 'frangipani' comes from an Italian noble family, but specifically a sixteenth-century marquess of which invented a plumeria-scented perfume. The Frangipani family was a powerful Roman patrician clan who rose to the height of their wealth and power during in the Middle Ages.

To grow the Frangipani tree you will need to be able to provide a frost free climate where temperatures do not drop much below 18 degrees Celsius over the winter. They will tolerate a wide variety of soils, from acid to alkaline and sandy to clay just so long as they are free-draining. Heavier clay soils will need their drainage improved or alternatively consider growing the Frangipani tree in a large container.

In cooler climate you can grow the Frangipani tree quite successfully in pots where they will flower reliably every summer. Just choose a quality potting mix such as John Innes No.3 and a wide, shallow pot. You may wish to mix in some horticultural grit or sand to the compost in order to improve the drainage further.Just remember that potted plants will require more frequent watering than those grown in the ground.

 Plant the Frangipani tree in a sunny position, and water only during the spring and summer. You should and hold off completely during the cooler months as they can be prone to root, branch and tip rot if conditions become increasing cold and wet. They are also tolerant to a certain amount of salt spray making them ideal for planting in coastal conditions

The Frangipani tree rarely need feeding, although they will produce bigger and better flowers if you spread a mulch of well-rotted farm manure or a sprinkling of granular fertiliser around the base of the tree during spring and summer. Be aware that any mulch applied should be kept away from the trunk to avoid rot.

Once established you will find that the Frangipani tree is both drought tolerant and also surprisingly fire hardy!


WHEN DO YOU HARVEST SWEET POTATOES?

$
0
0
Image credit - http://www.veggiegardeningtips.com/


Sweet potatoes will be ready to harvest in late summer, approximately 12 to 16 weeks after first being planted, but this doesn't mean they need to be lifted immediately as the flavour and quality of a sweet potato crop will improve with the oncoming colder weather. In addition you will also have larger tubers.

Image credit - http://hickeryhollerfarm.blogspot.co.uk/
The tubers can grow a foot or more away from the plant, so make sure that you give the give plenty of space when lifting in order to prevent nicking and damaging the skin from the lifting tool. Any damage to the surface of the tuber can encourage fungal infections which will spoil the crop.Wait until the soil is dry before lifting your crop as sweet potatoes covered in wet mud are much more difficult to dry off in the sun.

Dry the freshly dug sweet potatoes in the sun for several hours before move them to a curing room. Although there are no problems with cooking sweet potatoes fresh from the ground, they sweetness of their flavour will  improves after curing. Proper curing will also help the tubers heals and skin damage incurred during harvest and improves their ability to store.

The easiest way to cure sweet potatoes is to place them in newspaper-lined boxes. Next, place the boxes in a warm, well-ventilated room at approximately 30-35 degrees Celsius with about 85 percent humidity, and keep them there for a week or so. After curing, move the sweet potatoes to a cooler position when they can be stored 12-15 degrees Celsius and a humidity, of 75 to 80 percent. Once stored they should be eaten with a month.

For related articles click onto the following links:


HOW TO GROW THE MEXICAN SUNFLOWER FROM SEED

$
0
0


CLICK HERE FOR THE 'SEEDS OF EADEN' SEED SHOP

The Mexican sunflower - Tithonia rotundifolia is a gorgeous summer flowering half-hardy annual and while it may not particularly well known in European gardens its make for a stunning addition to any herbaceous or exotic border.

Image credit - http://pics.davesgarden.com/
You can sow Mexican sunflower seeds from February to March. Using either 3 inch pots or modular seeds trays fill with a good quality seed compost such as John Innes 'Seed and Cutting'. Lay the seed on the surface at a rate of one seeds per module or three seeds per 3 inch pot.Water gently by lowering the tray or pots into a bowl of water and allow the water to rise through the compost naturally. The compost will be wet enough once the surface changes colour.

Give the seeds a light covering of vermiculite, but do not exclude light from the seeds as they require light to help initiate germination.

Place the tray or pots in a heated propagator at an optimum temperature of 20-25 Celsius. Alternatively, seal inside a clear polythene bag and keep in a warm place such a bright windowsill - but one that does not receive direct sunlight. Keep the compost moist by watering with a fine hand-held mister or sprayer when necessary.

You can expect germination to occur within 7-21 days, at which point the tray or post can be removed from the propagator or polythene bag.

When they are large enough to handle, transplant the seedlings into individual 3 inch pots taking care to minimise any damage to the roots.

 Keep them under protection for a few more weeks and once they have established they can be hardened off and planted outside, but only once all risk of frost has passed. If you are planting in groups space them 30cm  apart in a sunny, well-drained spot in the garden. While the mexican sunflower is not particularly prone to damage from most pests and disease they will need to be protected from damage by slugs and snails.

HOW TO GROW THE STRAWBERRY TREE - Arbutus unedo

$
0
0


The Strawberry Tree (sometimes known as the Irish or Killarney Strawberry Tree) - Arbutus unedo is a gorgeous, evergreen tree from the Ericaceae family. Despite its Ericaceae background, the strawberry tree is surprisingly lime tolerant.

There are a number of cultivars available notably 'Elfin King', 'Integerrima', 'Quercifolia' and 'Rubra'.

You can plant the strawberry tree in October, or if you miss this opportunity from March to May, in a moist but well-drained soil. While Arbutus unedo and it cultivars are known to be lime tolerant, they will still perform best in a good, lime-free loamy soil. They will need a sunny position but keep them a sheltered position away from cold northern and eastern winds.

Be aware that the young plants can be particularly tender and will require winter protection of bracken or straw. Once they have established they will be able to withstand greater cold and exposure.

You should not prune your strawberry tree as this can quickly ruin its ornamental habit, although straggly shoots may be cut back to the main stems in April.

HOW TO GROW THE STRAWBERRY TREE FROM SEED

$
0
0


The Strawberry tree is a gorgeous, small, evergreen tree that is noted for its unusual strawberry-like fruits. usually propagated from cuttings,  the Strawberry tree can be rather expensive to purchase but if you can get hold of ripened fruit then you have an excellent chance of growing your own stock of Strawberry trees from seed.

You should sow Strawberry tree seeds when they are fully ripe, usually in March. Use a good quality compost such as John Innes 'Seed and Cutting' or create your own using 2 part moss peat and 1 part lime-free horticultural sand. Sow the seeds in pans, or large modular trays, water in and then place inside a cold frame.

Once the seedlings have emerged, they can be pricked out, but be careful so as to reduce any damage to the root systems. Plant these on onto individual 3-4 inch pots using John Innes 'No 2', gently water in and place back into the cold frame for another year or so.

The young plants will be ready for transplanting into their final positions in May to March. They will require a sunny sheltered position away from cold northerly or easterly winds. They are happy in an ordinary well-drained, but moist soil, but they will perform best in alkaline soils.

While young plants will benefit from some winter protection, the Strawberry tree will become progressively hardy as it matures

Agave lophantha 'Quadricolor'

$
0
0


Agave lophantha 'Quadricolor' is a gorgeous, small growing succulent native to Mexico. Growing to no more than 60cm height and 60-100 cm wide it is a surprisingly tough specimen. Pot grown specimens tend to grow no more than 30 cm in height and 30-45 cm wide. Despite its size Agave lophantha 'Quadricolor' is capable of withstanding temperatures as low as  - 10 degrees Celsius! In fact there are reports of them surviving even lower temperatures however the condition that there in afterwards was not mentioned.

Commonly know as the Quadricolor Century Plant, it produces dark green leaves up to 8 inch long, each one edged with yellow and a pale green mid-stripe. As a contrast the yellow marginal stripes are highlighted by dark reddish teeth, which will also flush red when grown in conditions of bright light giving the leaf four distinct colour zones.

It will take several years for Agave lophantha 'Quadricolor' to bloom Flowering beings with the emergence of a tall green stalk which can reach 4 metres tall in will specimens. The top of the stalk produces greenish-yellow flowers and with most Agaves, each plant will only flower once, after which it will die soon afterwards.

In northern European climates, plant Agave lophantha 'Quadricolor' in either full sun or bright, filtered light. In warmer temperate regions or even sub-tropical to tropical conditions it is best to  keep them sheltered from the full strength of the summer sun. Like most other agaves, Agave lophantha 'Quadricolor' will need to planted  in a well-drained soil. If you can provide it,  low nutrient, sandy soils will provide ideal conditions. They will tolerates dry conditions but will grow much faster with regular watering over the summer irrigation. Reduce watering over the autumn and then just keep moist, allowing the top couple of inches to soil to dry out before watering again. Keep it too wet and you are at risk of losing your plant from fungal root rots.

You will not need to feed Agave lophantha 'Quadricolor' as you would regular garden plants, in fact doing so can deform its habit and soften the leaves making them prone to insect and fungal damage. Be that as it may you can feed once every few weeks over the growing season with a low nitrogen fertiliser, or half dose regular fertiliser.

Pot grown specimens should be planted in a good quality potting compost such as John Innes No.2, although you can consider mixing additional horticultural grit or sand to improve the drainage further. Use preferably a porous terracotta pot when potting up, one that is no wider than 12 inches. Any wider and you may encounter problems when moving the plants to make the most of the seasonal temperatures due to its weight.

Over the summer place pot grow specimens outside in a sunny position, bit one once they have been hardened off for a week or so. In the winter, bring Agave lophantha 'Quadricolor' back into a protected environment once temperatures start to drop below 5 degrees celsius.

Propagation is from offsets from the base of the plant.


THE PERFECT FISH FINGER BREAKFAST SANDWICH RECIPE

$
0
0

The fish finger breakfast sandwich is not only a miracle of nutritional engineering, it is a meal in itself. It is more satisfying than a bacon sandwich and surprisingly the flavours combine to make it superior to almost every other sandwich bar a double whopper with cheese.

It includes all the major food groups (so long as you are happy to ignore the fact that it doesn't contain all of the major food groups), and it can improve brain function*. More importantly it can cure almost all common ailments* and actually make you more attractive to the opposite sex, but only if the members of the opposite sex are attracted to fish breath. Did I mention that it is also suitable for vegetarians? Vegans need not bother reading any further.

The ingredients are specific otherwise you will loose the effect of the flavour combination.

4 x proper Cod fish fingers, not those naff fish fillet jobbies
2 x slices of soft, white, freshly made farmhouse bread
2 x large dollops of chunky tartar sauce, Asda extra special is one of the best
1 x egg
1 x enough cheese to cover 1 x slice of bread
3 x dobs of butter
3 x tablespoons of olive oil

Instructions

Place the olive oil and 1 x dob of butter into a frying pan and bring to heat. The reason for the butter/oil mix is that it will give a crispier coat to the fish fingers. Place the fish fingers into the pan and turn the heat down to almost low so that they are gently spitting. It takes about 15 minute to properly cook fish fingers, turn them over every five minutes.

While the fish fingers are cooking you can prepare the rest of the sandwich. Butter each slice of bread with its own dob of butter, then spread both slices with a decent coating of tartare sauce.

Now fry up the egg.

Position the cheese on one slice of bread and then add the fried egg. Now wait for the fish fingers to finish cooking.

Once cooked, add the fish fingers to the slice of bread which has the cheese and egg on it and then place the other slice of bread, tartar side down, on the fish fingers. Cut the sandwich in half and garnish with a sprig of parsley. Now enjoy the taste sensation that is the perfect fish finger breakfast sandwich.

* research as shown that the fish finger breakfast sandwich can not do these things, and is a misrepresentation of the facts. In fact, all facts and opinions presented in this article may be a bit wobbly.


HOW TO TO TAKE CUTTINGS FROM THE STRAWBERRY TREE - Arbutus unedo

$
0
0


While it is relatively easy to grow the Strawberry tree from seed it can take 2-3 years before you have a plant that is large enough to plant outside. A far quicker method is to take heel cuttings, 3-4 inches long of half ripened wood in July. Give the parent plant a good watering the night before and then take your cuttings early in the morning while it is still cool. Remove the cuttings with a sharp sterilized blade but only when you have your pots and equipment ready to use. If the cuttings are left lying around in the heat they will soon desiccate and failure will be guaranteed. If you have no choice but to hold on to your cuttings for a while before planting then keep them them wrapped in a moist paper towel and keep them in a cool position

Image credit - http://www.sisef.it/forest@/contents/
Prepare new or sterilized 3 inch pots containing a good quality compost such as John Innes 'Seed and Cutting'. Alternatively you can mix your own compost using equal parts by volume - moss peat and sand. Dip the cut end of the cutting into a rooting hormone powder, tap off the excess and then using an appropriately sized dibber pre-drill a hole before placing the cutting into the compost. This sops the hormone powder being wiped off when inserting. Gently water and then place the pots into a heated propagator with a bottom heat of 16-18 degrees Celsius.

Once rooted, remove the propagator lid and turn of the heat. Move the young plant to a cold frame and leave for one or two years, poting on as necessary into larger pots containing a good quality compost such as John Innes 'No 2'.  The young plants will be ready for transplanting outside into their final position the coming March to May.

HOW TO GROW THE STRAWBERRY TREE - Arbutus unedo

HOW TO GROW THE BLUE DIAMOND IMPATIENS FROM SEED - Impatiens namchabarwensis

$
0
0
Image credit - http://www.strangewonderfulthings.com/


The Blue Diamond Impatiens - Impatiens namchabarwensis is a gorgeous new species recently discovered  in the Namcha Barwa Canyon in Tibet. Unfortunately current availability of the blue diamond impatiens is sparse however it is sometimes possible to purchase seed. Luckily growing the blue diamond impatiens from seed is a relatively simple affair once you have gone past the stratification process.

Image credit - http://www.finegardening.com/
As with many things in life it is easy to say but difficult to obtain, but if you can it is best to start with seed that is as fresh as you can get it.

Using 3-4 inch pots, sow the seed immediately on the surface of a good quality soil based compost such as John Innes 'Seed and Cutting', at a rate of 5 seeds per pot. Gently water in by placing the pot in a bowl of water and allowing it to seep up through the compost. Once the compost has changed colour on the surface you can remove the pot from the bowl.  Cover the seed by applying a light covering of horticultural grit or vermiculite on the surface of the pots.

Place the pots in a cool, frost-free position, but do not exclude light. Do not allow the surface to completely dry out and spray with water periodically to both water the compost and maintain humid conditions.

Unlike the usual Impatiens species that you would find in your local plant retailer, Impatiens namchabarwensis can be extremely slow to germinate, even taking several months before the first seedlings emerge.

Once they are of a suitable size you can pot on the seedlings individually into 3-4 inch pots containing a good quality compost such as John Innes 'No2'. You may wish to add some horticultural grit or sand to improve the drainage further. They can be moved to a warm, shady position outside or if there is a risk of frost then keep them under protection. In Mediterranean climates they can be grown outside in full shade, or in cooler northern European countries it will be happy in partial shade so long as it is grown in a rich, damp but well-drained soil. Keep the compost damp through the growing season.

For related articles click onto the following link:
HOW TO GROW THE HIMALAYAN BLUE POPPY

HOW TO GROW BASIL IN THE GARDEN

$
0
0


Sweet basil - Ocimum basilicum, is one of the most commonly used of all the culinary herbs, especially across Europe and Asia. Of course you can readily purchase basil in the dried section of any supermarket but you will only get that genuine, aromatic flavour if you have picked the leaves fresh from the plant.

Native to subtropical Asia, basil is surprisingly easy to grow, even in northern European gardens. You can either plant pot grown basil plants, or grow your own from seed. Despite its subtropical origins, growing basil in the garden is extremely easy although you will need to treat it as a tender annual. It will be happy in any well-drained soil, and while it will be quite happy growing in full sun it will  produce larger, softer leaves in a west facing or partially shaded position.

Water the plants during dry weather, but let the soil dry out before you water again. Avoid getting water on the leaves as this can encourage scorching. Avoid over feeding fertiliser as this will encourage the basil to flower.

Flowering is a problem as it will divert the plants energy away from producing the foliage. The stem will also become woody, and essential oil production will decline.

If you chose to grow your own basil from seed then sow your seed indoors during March in either pots or modular seed trays using a good quality compost such as John Innes 'Seed and Cutting'. Do not cover with compost as basil needs light for germination, although you can give a light dressing vermiculite. Gently water and place on a warm, bright windowsill.

You can sow basil seeds directly outside once the threat of late frosts have passed at the end of May. Sow them 1/2 inch deep in seed drills leaving a 18 inch gap between each drill. Once germinated thin out to the strongest seedling until they are approximately 12 inches apart.

SWEET BASIL - Ocimum basilicum

HOW TO GROW SHARON FRUIT - Diospyros kaki

$
0
0


Otherwise known as the Japanese persimmon, the hardy Sharon fruit - Diospyros kaki is a deciduous fruit tree rarely grown in the gardens of English, due in part to its strong association with far warmer mediterranean and Asian climates. Be that as it may, it is the most widely cultivated species within the Diospyros genus and is among some of the oldest crops still in cultivation. In fact its use has been recorded as far back as 2000 years in China.

The Sharon fruit tree is considered to be either a large shrub or a small tree, and grown for its edible, orange-yellow tomato shaped fruits. The flowers are diecious, not particularly showy, and appear in the spring. The female blooms are a creamy white while the males emerge pink.
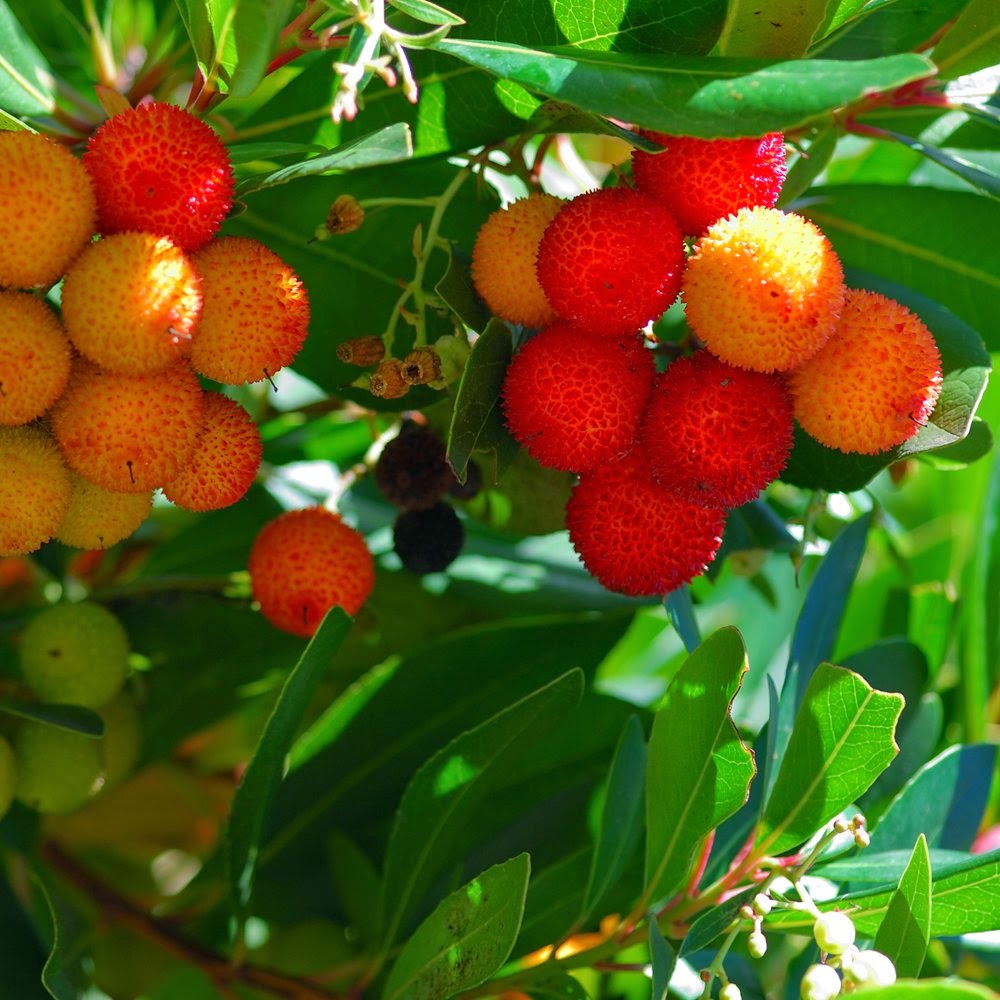
However as an ornamental tree is should alway be considered a worthy garden plant if only for the large, exotic and lustrous leaves and their glorious orange-yellow to orange-red and plum-purple coloured autumn-effect foliage. Should you chose to, the brightly coloured fruit can be left unharvested on the tree as a decorative effect. Alternatively harvest the fruits when the skins reach a deep orange colour.

When growing the Sharon fruit in a more northern European garden it will need a sunny position, sheltered from northerly and easterly winds. It will grow best in a deep, moist, slightly acidic and well-drained loamy soil. However while it is surprisingly tolerant of varying soil types, it will prefer moist, sandy soils. Water during its first year, particularly during periods of drought or high temperatures. However once established it is reasonably drought tolerant. Avoid planting Sharon fruit trees in heavy soils or those soils which are prone to waterlogging.
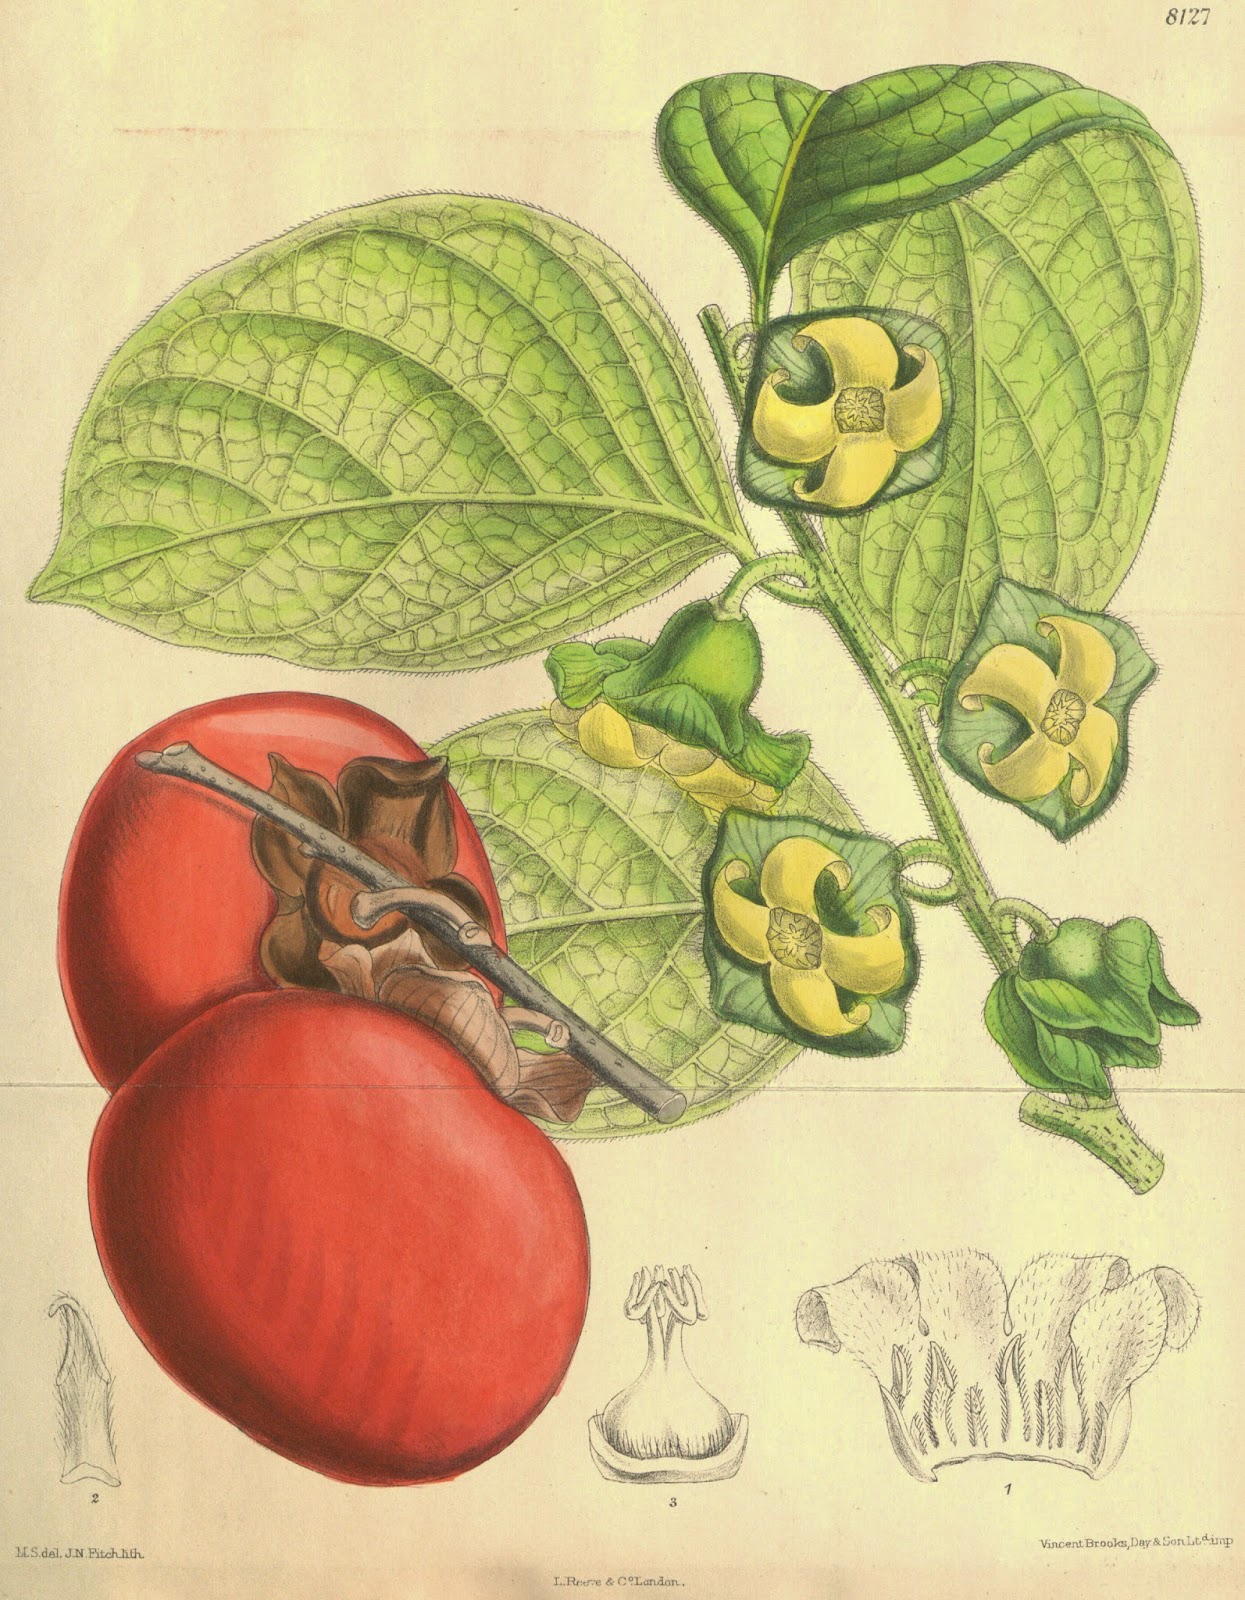
The Sharon fruit is prone to root sucker. These should be removed unless a naturalized effect is desired.
Viewing all 1613 articles
Browse latest View live


Latest Images